

![]()
![]()
Have you ever thought, if there was an automatic way…? labeleR is an R package to optimize the creation of your own collection labels, scientific documentation for events, and much more! 🏷️
If you need to create your labels (for your lab, plant vouchers, insect collections), attendance, participation certificates or accreditation badges (to a course, a congress)… labeleR is the answer! Decide which function to use, copy the code into your console, modify it and run! Keep an eye 👀 on this easy tutorial on how to use it 👇
To install the latest stable version of labeleR from
CRAN, just use install.packages() function.
install.packages("labeleR")However, if you want to install the latest version of labeleR from GitHub, you might need to install the devtools package. Once you have it, you just have to specify the repository and install:
# install.packages("devtools")
devtools::install_github("EcologyR/labeleR")
Ps. If you want to clone the repository, you can find the code here.
labeleR depends on LaTeX, so you must have it also installed. We recommend using TinyTeX.
First, you would need to install the tinytex R
package:
# install.packages("tinytex")
tinytex::install_tinytex()
⏱️ The first time you install tinytex or use labeleR it may take a while until all packages are correctly installed. Don’t worry, it will be much quicker next time!
In case you have problems installing TinyTeX’s packages,
try running this in your console:
    tinytex::tlmgr_install(pkgs = c( "zref", "needspace", "pagecolor",
                                     "bookmark", "changepage", "fp",
                                     "mdframed", "ms", "pgf",
"pspicture", "qrcode"))library("labeleR")The very first thing you need to start using labeleR is a dataset
where the information is included. This dataset can be imported to the R
environment from a file (‘.csv’), excel sheet (‘.xlsx’), a Google Sheet,
using read.table(), readxl::read_excel(),
gsheet::gsheet2tbl() and alike functions.
Here an example of a dataset imported from a Google Sheet URL:
library(gsheet)

#URL: https://docs.google.com/spreadsheets/d/1inkk3_oNvvt8ajdK4wOkSgPoUyE8JzENrZgSTFJEFBw/edit#gid=0
people_list_long <- gsheet2tbl("1inkk3_oNvvt8ajdK4wOkSgPoUyE8JzENrZgSTFJEFBw")
A key point is that the Google Sheet document must grant at least view access to anyone with the link; otherwise R will not be able to open it.
When using labeleR’s functions, there are some widely used arguments and nomenclature you should be aware of.
The first required argument in all functions is data,
which is the data frame that has been previously loaded. The second one
is path, which is the folder where the output PDFs will be
stored. In case the specified folder does not exist, it will be
automatically created. If you want to name the output PDF file in a
certain way, you must specify it using the filename
argument. Additionally, you can store the created intermediate files
(e.g. RMarkdown, picture files) using
keep.files = TRUE.
Ultimately, labeleR uses its own templates to create the documents.
However, these can be modified for specific purposes. To do so, open a
RMarkdown file in RStudio from the labeleR template you want to edit,
and after saving it locally, specify its directory path in the
template argument.
RStudio > File > New File > RMarkdown… > From Template > {LabeleRTemplate.Rmd}
Pictures (such as logos or signatures) are included in some
templates. For these, argument names are lpic (standing for
left picture, in the top), rpic (right picture, also in the
top), signature.pic (signature picture) in the
certificates, and logo in the collection label. In all
these cases the path to the picture file must be provided.
As for the arguments nomenclature, there are two kinds. On the one
hand, the “fixed” arguments, which are those that remain the same in all
the documents (e.g. the name of a conference in an accreditation, or the
name of a herbarium institution). These arguments are named using a
unique word (e.g. event or speaker), and can
be filled in using free text. On the other hand, “variable” arguments
are those which vary among documents, and therefore differ among rows
(e.g. attendees names to a conference, or species in herbarium labels).
To specify the column of data in which this information is stored,
two-word parameters are used (i.e. name.column or
species.column). The only argument that does not follow
this philosophy is qr (present in
create_herbarium_label,
create_collection_label and
create_tiny_label). This parameter can be set as a column
name, used as a “variable” argument, or as a free text,as a “fixed”
one.
Now let’s start using labeleR!
Here we will display a blank example to help you see the internal template structure, accompanied by some examples inspired in the Harry Potter universe! 🔮
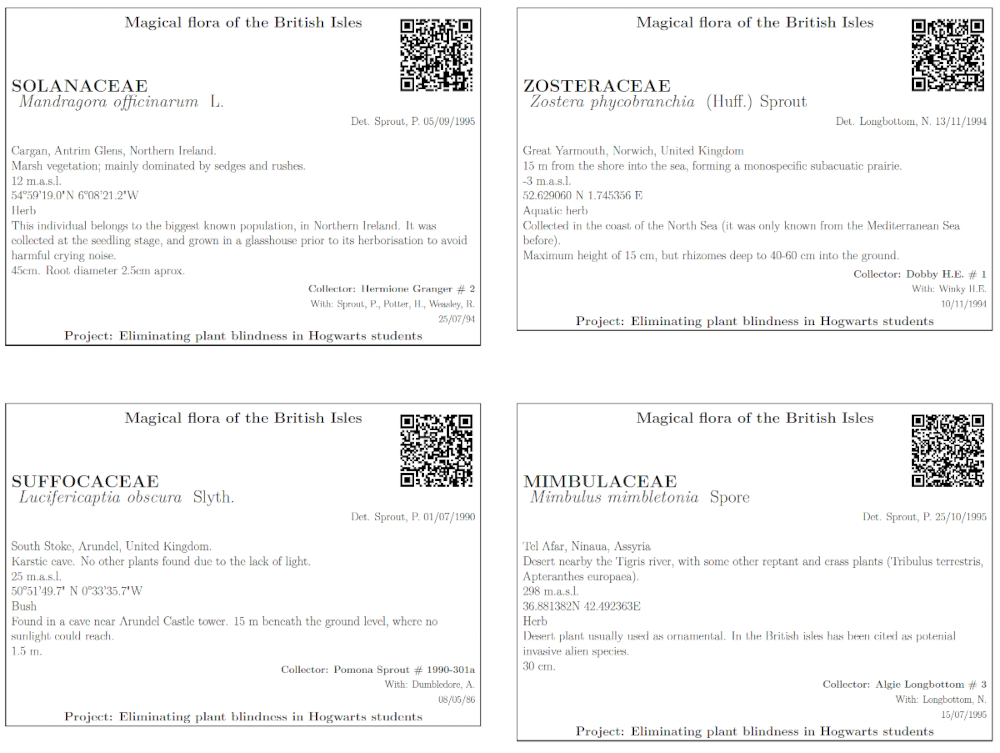
Herbarium labels are one of the documents with more variable
parameters, as there is a lot of information that can be included. Here,
we have chosen what we consider to be the most useful parameters, but we
have included three free fields for the user to include the information
they prefer. Of course, a field’s name does not force the user to use it
for that category (location can be set in the elevation column, on top;
and vice versa), but be aware that the family.column
content will always be capitalized, and the taxon.column
one in italics, so those ones we recommend to use them as stated.
As said before, the QR can stand for a free text (and therefore remain identical in all labels), or be a column name, and the codes will be rendered with the individual information of each row. Four different labels will fit in each of the A4 pdf pages.
Warning! Including too long texts may cause the alteration of the structure of the labels, so we recommend to be concise (specially with area description!)
In this example, we show the labels some students have created for their herbarium assignment of the Herbology class.
create_herbarium_label(
  data = herbarium.table,
  path = "labeleR_output",
  filename = "herbarium_labels",
  qr = "QR_code",
  title ="Magical flora of the British Isles" ,
  subtitle = "Project: Eliminating plant blindness in Hogwarts students",
  family.column = "Family",
  taxon.column = "Taxon",
  author.column = "Author",
  det.column = "det",
  date.det.column = "Det_date",
  location.column = "Location",
  area.description.column = "Area_description",
  latitude.column = "Latitude",
  longitude.column = "Longitude",
  elevation.column = "Elevation",
  field1.column = "life_form",
  field2.column = "Observations",
  field3.column = "Height",
  collector.column = "Collector",
  collection.column = "Collection_number",
  assistants.column = "Assistants",
  date.column = "Date"
) |
|---|
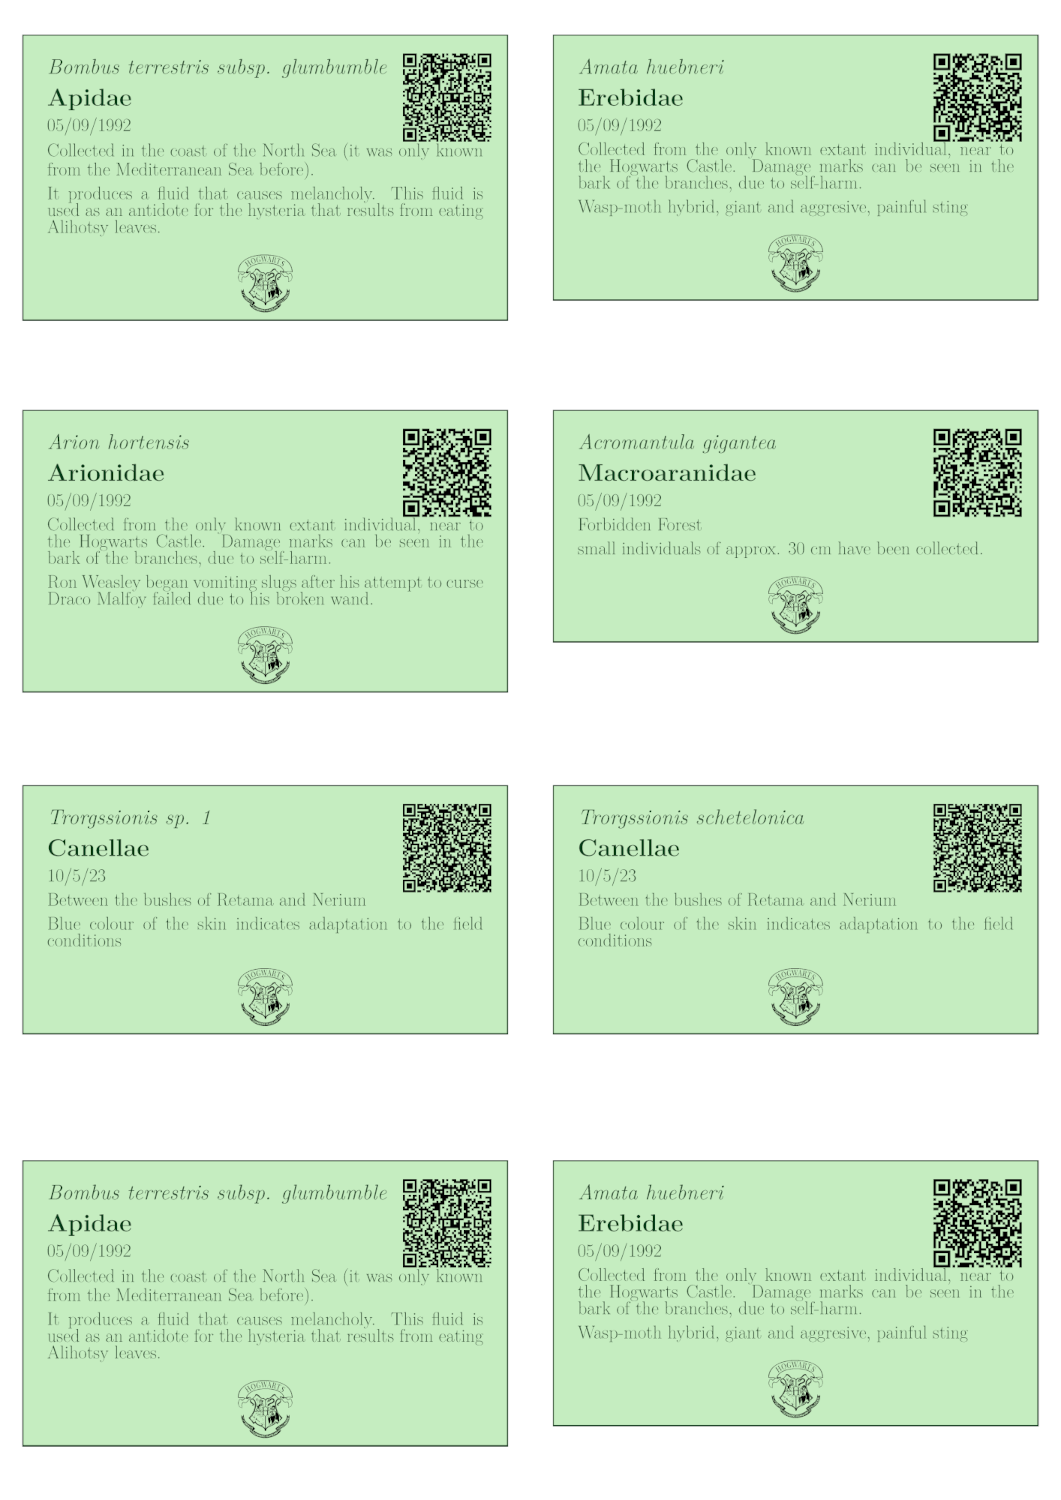
Collection labels are one of the most aesthetic labels. They have
five variable parameters (which are not recommended to be too long, as
explained in the herbarium labels), along with the possibility of
including a QR code (fixed or variable), an image (logo or picture).
Field 1 will be always capitalized (as in family.column in
the herbarium label), and Field 2 italicized. Any field can be left
blank.
As a novelty, the user may manually fix the backgroud and text colors to their preference, using HTML color codes (same code as HEX, but without the ‘#’). By default, background colors are two hues of green. Eight different labels will fit in each of the A4 pdf pages.
In this example we can see six labels created for the school’s displayed collection of stuffed animals.
create_collection_label(
  data = collection.table,
  path = "labeleR_output",
  filename = "labels",
  qr = "QR_code",
  field1.column = "field1",
  field2.column = "field2",
  field3.column = "field3",
  field4.column = "field6",
  field5.column = "field7",
  system.file("rmarkdown/pictures/Hogwarts_BnW.png", package = "labeleR"),
  bgcolor = "D0ECC1",  #White is "FFFFFF",
  textcolor = "1E3F20" #Black is "000000"
) |
|---|
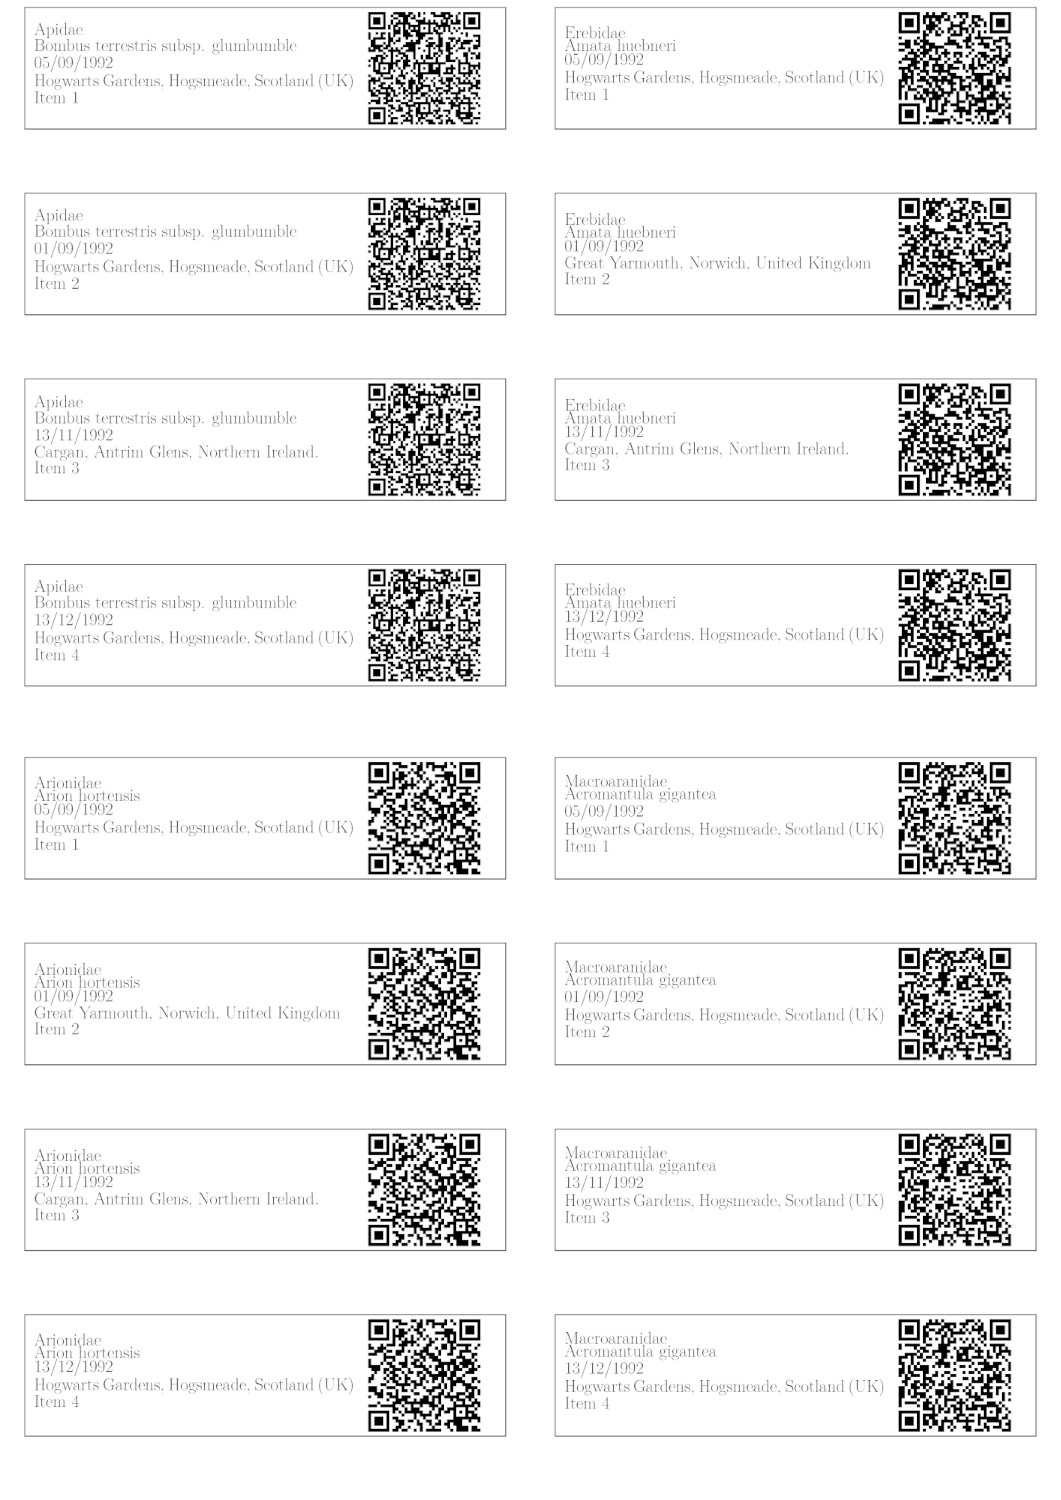
This type of labels is a simplified version of the previous, and includes just five variable fields and the possibility of including a QR code.
We recommend as in the previous cases not to include too long texts neither in the variable arguments nor in the QR, as they can become difficult to read.
16 different labels will fit in each of the A4 pdf pages. In case this size is too big for the pretended use (as can happen for small insect collections, for example), we recommend to use the “print several pages per sheet” in the printer’s options.
Here, tiny labels are created for typical collections stored in insect collection boxes, so a normal collection label would be too big.
create_tiny_label(
  data = tiny.table,
  qr = "QR_code",
  path = "labeleR_output",
  filename = "tinylabels",
  field1.column ="field2",
  field2.column ="field1",
  field3.column ="field3",
  field4.column ="field4",
  field5.column ="field5"
) |
|---|
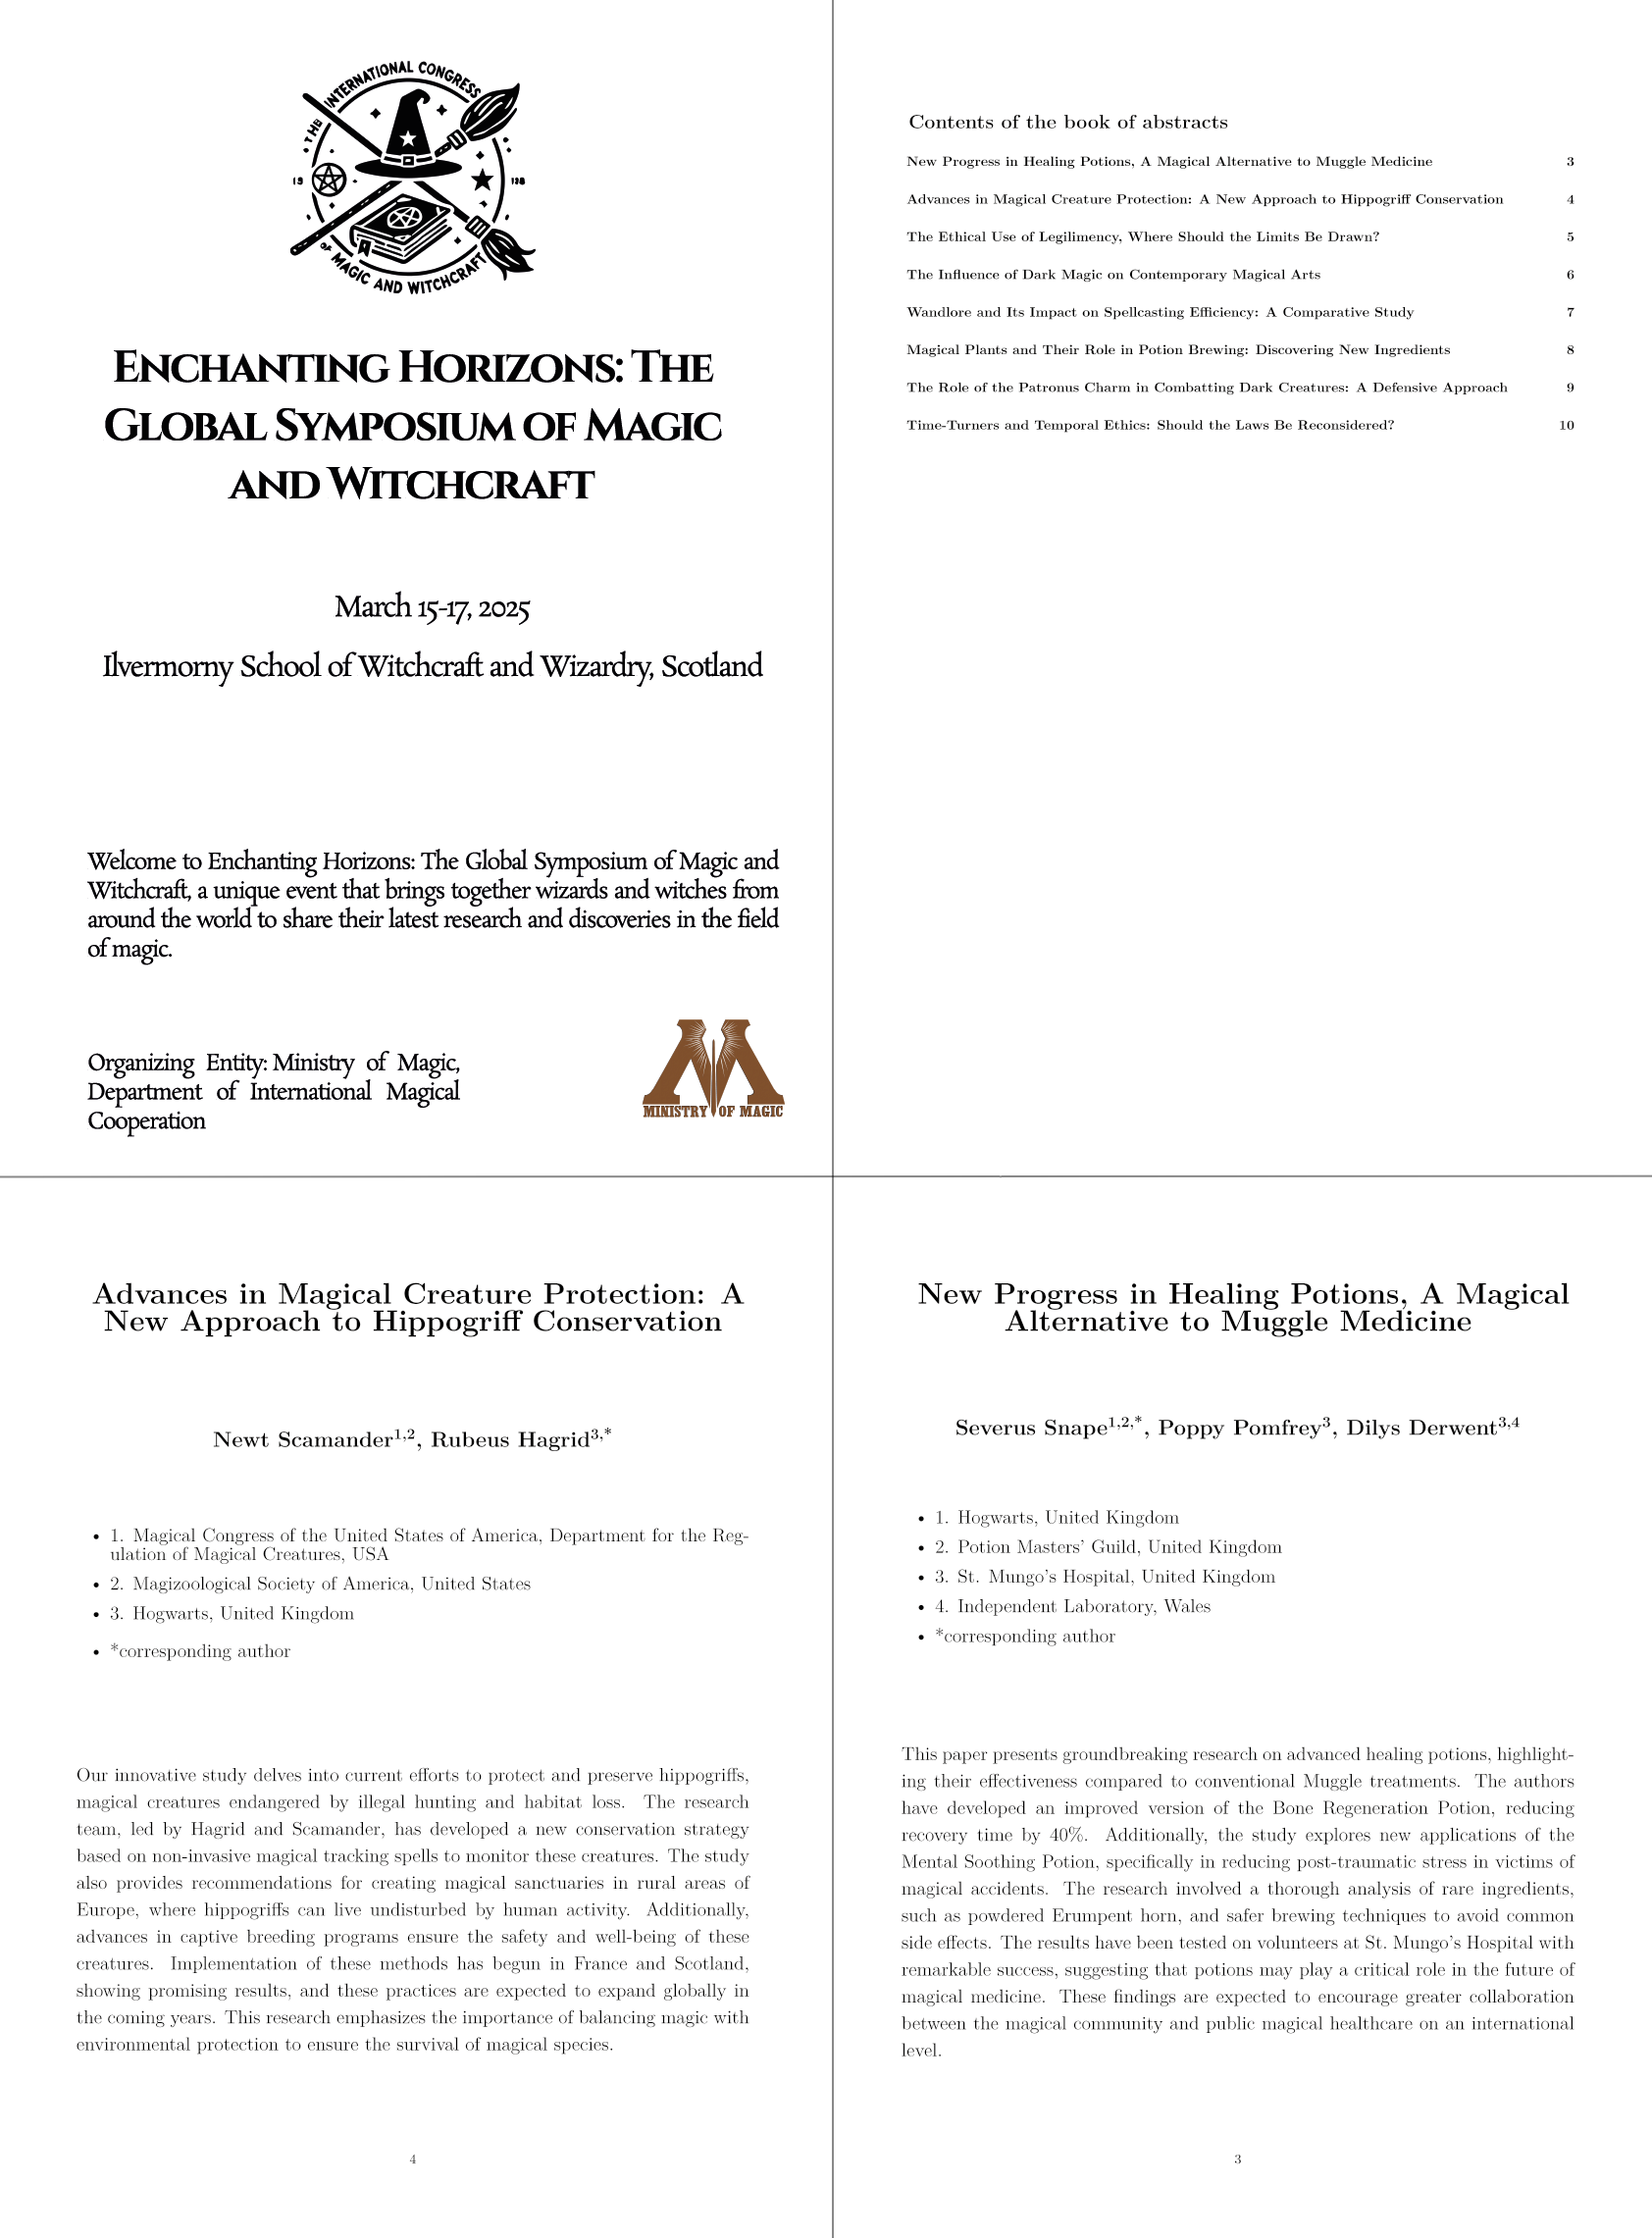
Abstract books result in a single document with multiple pages. Each abstract will appear on a different page, following the same order as in the dataframe rows. If other order of appearance is desired, just arrange your columns in the original dataframe. Each page will include four variable fields (title, author names, affiliations and the abstract texts). The output document can include a table of contents with the titles and page numbers of all abstracts. Additionally, you can also insert a front page that will appear at the beginning of the document.
Here we create a document with several abstracts that were presented at the XXX Congress, including a cover and a table of contents. In the image we present the first four pages.
create_abstractbook(
data=abstract.table,
path = "labeleR_output",
filename = "congress_abstractbook",
title.column = "abstract_title",
authors.column = "authors",
affiliation.column = "affiliation",
text.column = "abstract_text",
title.cex = 20,
authors.cex = 15,
affiliations.cex = 14,
text.cex = 12,
frontpage = "Congress_frontpage.pdf"
)As an example, we present the accreditation cards that might have been used in the International Conference of Muggleology, where the only changing fields are names and affiliations of attendees.
 |
|---|
Badges can be used for personal accreditation in congresses, courses, meetings, etc. They have only two variable fields (name and affiliation), and can include two top logos or images, although are not signed. Accreditation cards include a dot line in the bottom for individual hand-edition.
create_badge(
  data = badges.table,
  path = "labeleR_output",
  filename = "badges",
  event = "INTERNATIONAL CONFERENCE OF MUGGLEOLOGY",
  name.column = "List",
  affiliation.column = "Affiliation",
  rpic = system.file("rmarkdown/pictures/Hogwartslogo.png", package = "labeleR"),
  lpic = system.file("rmarkdown/pictures/MinMagic.png", package = "labeleR")
)
As an example, we present the accreditation cards that might have been used in the International Conference of Muggleology, where the only changing fields are names and affiliations of attendees.
 |
|---|
NOTE: It is possible to send certificates automatically via email! To see how go to the FAQ section!
Attendance certificates are one of the easiest templates; the only variable parameter is the name of the attendees. Our template allows to include a signature as an image, so the signer does not have to go through them all. This certificate is available both in English and Spanish. In case pictures look too big or small, it is possible to modify their size in the template.
The structure of the certificate looks as follows:
In this example, we create four different certificates for four students of Hogwarts School, in which the Headmaster certifies they have attended 200 h of the Potions class.
create_attendance_certificate(
  data = attendance.table,
  path = "labeleR_output",
  filename = "attendance_certificates",
  language = "English" ,
  name.column = "Names",
  type = "class",
  title = "Potions (year 1992-1993)",
  date = "23/06/1993",
  hours = "200",
  freetext = "taught by Professor S. Snape",
  signer = "A.P.W.B. Dumbledore",
  signer.role = "School Headmaster",
  rpic = system.file("rmarkdown/pictures/Hogwartslogo.png", package = "labeleR"),
  lpic = system.file("rmarkdown/pictures/Hogwartslogo.png", package = "labeleR"),
  signature.pic = system.file("rmarkdown/pictures/dumbledore.png", package = "labeleR")
)
In this example, each certificate will be rendered in an individual PDF document.
 |
|---|
Participation certificates are similar to the previous, but with more variable parameters (such as speaker, affiliation, title, etc.). As well as the attendance certificate, these documents can be rendered in English and in Spanish.
Here, Albus Dumbledore certifies that four of the school teachers have participated in some seminars with different titles, different affiliations, dates and communication types.
create_participation_certificate(
  data = participation.table,
  path = "labeleR_output",
  filename = "participation_certificates",
  language = "English",
  name.column = "Name",
  affiliation.column = "House",
  comm.type.column = "Comm.type",
  title.column = "Title",
  date.column = "Date",
  type = "online",
  event = "seminar",
  freetext = "organized by Hogwarts School of Magic and Wizardry",
  signer = "A.P.W.B. Dumbledore",
  signer.role = "School Headmaster",
  rpic = system.file("rmarkdown/pictures/Hogwartslogo.png", package = "labeleR"),
  lpic = system.file("rmarkdown/pictures/MinMagic.png", package = "labeleR"),
  signature.pic = system.file("rmarkdown/pictures/dumbledore.png", package = "labeleR")
)
In this example, each certificate will be rendered in an individual PDF document in a common folder.
 |
|---|
The ´labeleR´ philosophy is quite simple: creating documents with a constant structure but varying dataset information. Then, the future of labeleR is encouraging and unpreditable, able to include multiple and diverse options! For now, we have included a new function dedicated to ease teaching tasks!
The aim of this function is to randomize the questions and possible answers inside a multiple choice exam to obtain different versions. This can solve one of the main teachers’ tasks: prepare exams with different answers to avoid students not focused on their own exam during a test, trying to extract information from their peers within a class (but also between courses and even among years…!)
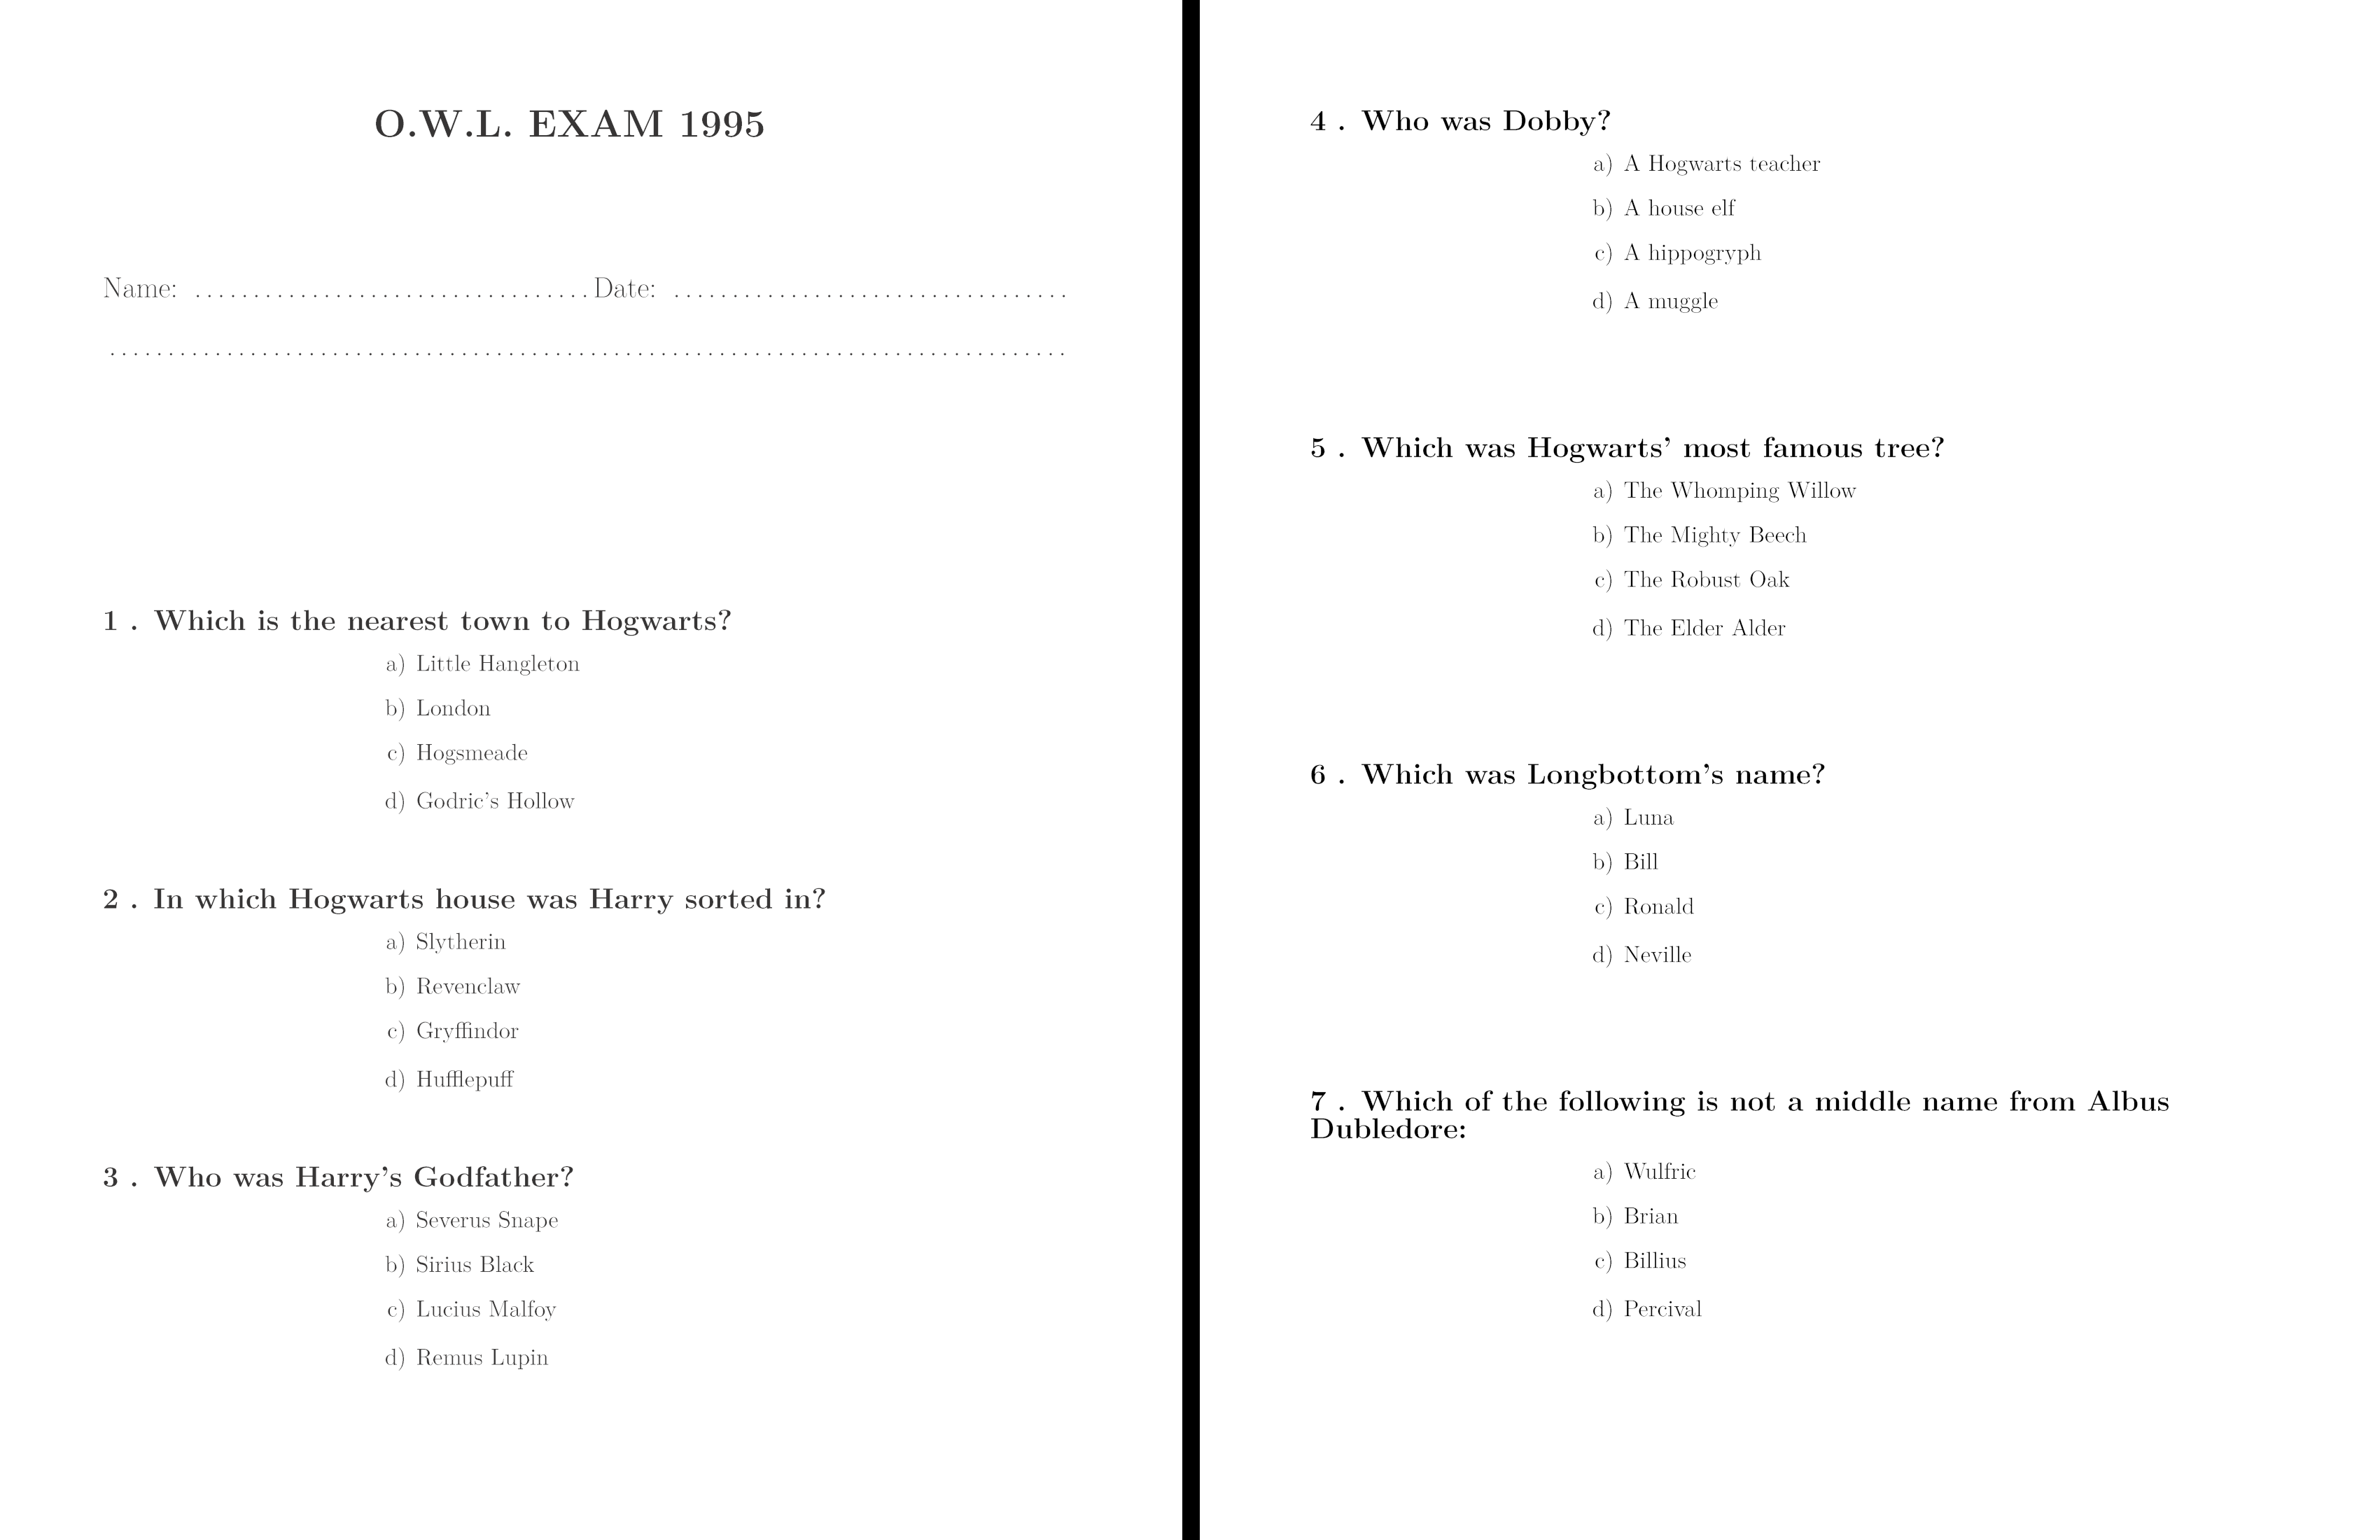
This function creates a multiple choice exam, with 4 questions per
page and an optional image associated to each question (please note that
the first page includes the title plus 3 questions). Each time the
function is run, both questions and answer will be randomized. to be
able to obtain the same version of an exam, you must set the same seed
number (note it somewhere!), which can be useful in case we want to
recover a lost version. A solution document with the correct answers
underlined if the argument solutions is set to TRUE.
create_multichoice(
  data = multichoice.table,
  path = "labeleR_output",
  filename = "example_exam",
  title = "Example test",
  question.column = "question",
  option1.column = "opt1.correct",
  option2.column = "opt2",
  option3.column = "opt3",
  option4.column = "opt4",
  start = 1,
  solutions=T,
  seeds = c(1:2)
) |
|---|
Sending attendance or participation certificates one by one by hand can be a real nightmare, so labeleR can do it for you (do not get scared, it is really easy!). The only things you need are a gmail account and all the recipient mail addresses stored in a column of your data frame.
The first thing labeleR needs is permission to send emails. Do not
worry, this will only be required the first time you do it! Function
configure_email() will drive you step by step through the
whole process, but if you prefer to do it manually, go to: https://myaccount.google.com/apppasswords and create an
app using your gmail account.
Warning! Please bear in mind that the gmail account
you use will be the one sending the emails, and thus visible for all
recipients.
Once accessed, you have to create an app (the name will not be
visible!), and you will be given a password. Save both somewhere safe,
as you will be asked for them any time you use this feature.
Once you have your mailing application, you have to configure the
structure you want to use for the mailing distribution (i.e. subject,
body, and cc or bcc if you wish). To configure it, just run
configure_email(user = "youruser@gmail.com", app.name = "yourapp")
, being user your gmail account previously used, and
app.name the application name you have already created.
Remember to have your password with you, as you will be asked for
it.
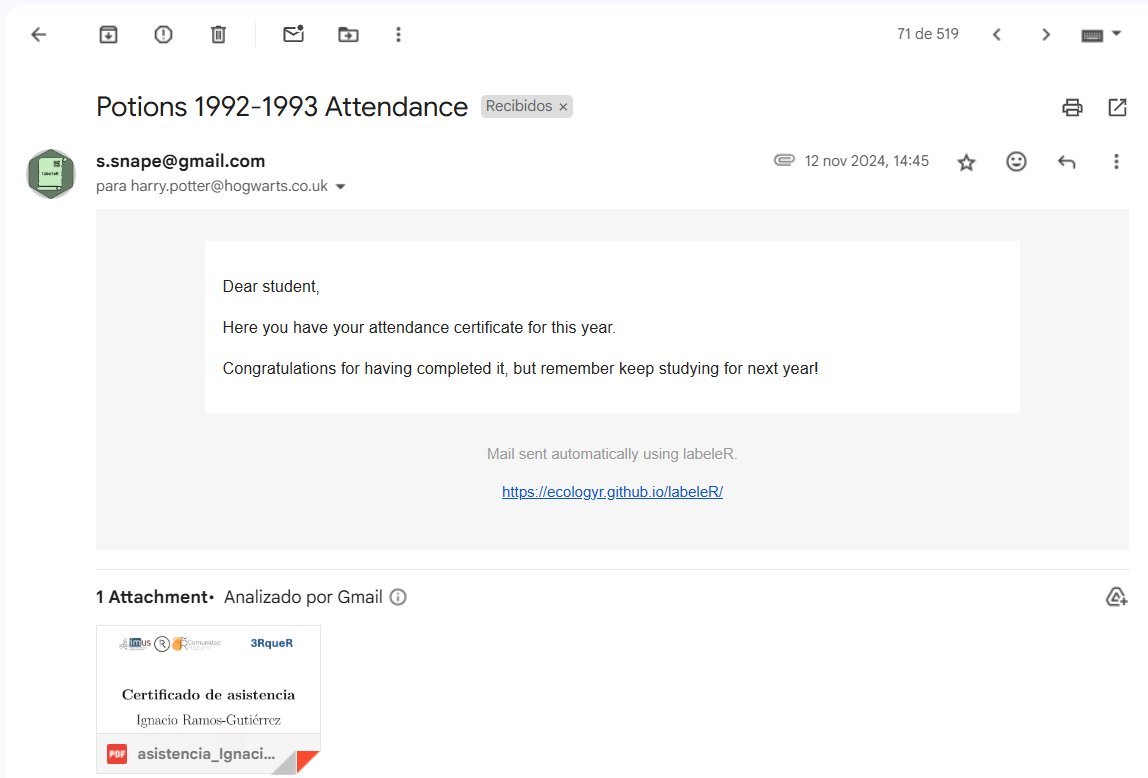
myemail <- configure_email(user     = "s.snape@gmail.com",
                           app.name = "e-owl",
                           subject  = "Potions 1992-1993 Attendance",
                           body     = "Dear student,
                                       here you have your attendance certificate for this year.
                                       Congratulations for having completed it, but remember keep studying for next year!",
                           cc       = c("albus.dumbledore@hogwarts.co.uk",
                                        "minerva.mcgonagall@hogwarts.co.uk"),
                           bcc      = "cornelius.fudge@min.magic.co.uk"
                           )
Great! Now you can send all emails as soon as they
are rendered. Just remember to specify the column of your data frame
storing each recipient email address in email.column and
the created configuration object (here, myemail) in the
email.info slot.
Just for precaution, labeleR will ask if you are sure
you want to send them, but if you are, just click “Yes” and they will be
sent as soon as they are rendered!
Here an example of how the recipient will receive the mail:
 |
|---|
create_attendance_certificate(
  data = attendance.table,
  path = "labeleR_output",
  filename = "Potions_grades",
  language = "English" ,
  name.column = "Names",
  type = "class",
  title = "Potions (year 1992-1993)",
  date = "23/06/1993",
  hours = "200",
  freetext = "taught by Professor S. Snape",
  signer = "S. Snape",
  signer.role = "Potions Professor",

  email.info = myemail,
  email.column = students.mails

)This implementation should be used just to change text formats in only a part of values stored in columns (variable parameters).
To do so, you must edit the cell value, specifying where the italics
text must start with \\textit (or \\emph,
which allows to open italics in a reular text, and vice-versa), and
\\end where it ends; and \\textbf followed by
\\end for bold text. In case you want to combine both, you
will have to specify \\end twice.
For example, this could be helpful to include italics in a species name which is included as part of a title; where just the species name should be italicized.
seminar.table <- data.frame(
  "Name" = "Rubeus Hagrid",
  "Date" = "01/01/1996",
  "Title" = "Population dynamics of a species of giant spider
  (\\textitAcromantula gigantea\\end) in Hogwart's Forbidden Forest",
  "Comm.type" = "seminar",
  "Affil" = "Hogwarts Keeper of Keys and Grounds")

create_participation_certificate(
  data = seminar.table,
  path = "labeleR_output",
  filename = "participation_certificates",
  language = "English",
  name.column = "Name",
  affiliation.column = "Affil",
  comm.type.column = "Comm.type",
  title.column = "Title",
  date.column = "Date",
  type = "online",
  event = "seminar",
  freetext = "organized by Hogwarts School of Magic and Wizardry",
  signer = "A.P.W.B. Dumbledore",
  signer.role = "School Headmaster",
  rpic = system.file("rmarkdown/pictures/Hogwartslogo.png", package = "labeleR"),
  lpic = system.file("rmarkdown/pictures/MinMagic.png", package = "labeleR"),
  signature.pic = system.file("rmarkdown/pictures/dumbledore.png", package = "labeleR")
)
 |
|---|
citation("labeleR")
#> To cite package 'labeleR' in publications use:
#>
#>   Ramos-Gutierrez I, de Aledo JG, Mateo-Martín J, Rodríguez-Sánchez F
#>   (2025). _labeleR: Automate the Production of Custom Labels, Badges,
#>   Certificates, and Other Documents_.
#>   <https://EcologyR.github.io/labeleR/>.
#>
#> A BibTeX entry for LaTeX users is
#>
#>   @Manual{,
#>     title = {labeleR: Automate the Production of Custom Labels, Badges, Certificates, and Other Documents},
#>     author = {Ignacio Ramos-Gutierrez and Julia G. {de Aledo} and Jimena Mateo-Martín and Francisco Rodríguez-Sánchez},
#>     year = {2025},
#>     url = {https://EcologyR.github.io/labeleR/},
#> }The development of this software has been funded by the European Union - Next Generation EU, Fondo Europeo de Desarrollo Regional (FEDER) and Consejería de Transformación Económica, Industria, Conocimiento y Universidades of Junta de Andalucía (proyecto US-1381388 led by Francisco Rodríguez Sánchez, Universidad de Sevilla).